Showing posts with label projects. Show all posts

Monday, March 26, 2012

DIY: Simple Double Necklace


This is a super easy and basic jewelery project that any beginner can do. All the supplies you can find pre-made at the store. (I found every thing at Michales)

What you need:
1 18 inch chain (the chain I got already came with a clasp on it)
1 24 inch chain (this chain didn't come with a clasp)
2 pendants that go together. I chose a bird and a tree.
A pair of Needle Nose Pliers

Sunday, February 26, 2012

DIY: Spiral My Bangle

One accessory that I am forever addicted to is bangles. I freaking love bangles! But every now and then I buy a set of bangles thinking that I'm going to wear them with some out fit, then I buy them and realize that no... I will not be wearing those with the outfit I intended for. Well, these have started to pile up. 


Now, to stop my bad habit of buying new bangles I'm instead going to re-purpose them into new bangles. Tonight's tutorial is one of my bangle experiments.

What you need:
Polymer Clay (preferably 2 contrasting colors)
Bangle/Bracelet

Tuesday, February 21, 2012

Kniting Pattern: Gap-tastic Cowl

Hello everybody!  I must apologize on the delay on posts lately. I've been busy knitting and getting over a cold. But now I'm healthy again and to celebrate I thought I'd post up another knitting project.


This is a fun and simple pattern to knit. I knitted this cowl for my boyfriends mom for Christmas this past year. This pattern is written by http://www.heyjenrenee.com/. And is available on ravelry as a free pdf download here!

All you need is:
2 balls of heavy weight yarn (approx 153 yds each)
US 13 24 inch circular needle

All you need to know:
Long tail cast on
Join in circle
Knit & Purl (throwing) or Knit & Purl (continental)
How to add another ball of yarn
Bind off
How to weave in the ends

Tuesday, January 31, 2012

DIY: Photo Candle Holders

So I decided it was about time I showed you all another tutorial for a gift I made for my family for Christmas. It's a lot of fun to make and I'm definitely making more!


This is a super simple and cheap gift idea that is guaranteed to make any sentimental person break down and cry. That is if you are using photos that mean something to that person. You can always use non sentimental photos, but I can't guarantee the tears then. Just kidding...


What you'll need:
Glass Candle Holders
Clear Shipping Labels
A Digital Copy of a Photo
Printer

Tuesday, January 10, 2012

DIY: Harry Potter Golden Snitches


Having a Harry Potter themed party anytime soon? Then this will be one of the perfect treats you can serve (and it hardly takes any time). I made these for my friends New Years Eve party, which was Harry Potter themed. We drank butter beer and ate a big feast (fyi... don't eat a big turkey on a night you need to try to stay awake), we also ate jellie bellies (for the every flavor bean), And watch a ton of Harry Potter movies. It was quite fun!

What you need:
Ferrero Rocher candies
White or Gold feathers
Hot Glue Gun

Saturday, January 7, 2012

Knitting Pattern: Transverse Cowl

Guess what everybody... I wrote another knitting pattern!!! This one is also for a cowl, but it has a really nice diagonal pattern to it. It's a simple pattern that again is just interesting enough to make sure you don't get bored. The diagonal pattern is created by doing an oblique rib stitch.


What you'll need:
Size 10 - 29" inch long circular needle
Stitch Marker
3 Balls of Bernat Alpaca Natural Blends yarn. (or roughly 260 - 360 yards of some bulky 12ply yarn) Mine is the color called Fern.


What you need to know: (click on the links if you need a video to show you how)
Long tail cast on
Join in circle
Knit
Purl (continental) Purl (throwing)
How to add another ball of yarn
Bind off
How to weave in the ends
You don't have to know this, because the pattern walks you through how to do this, but if it helps, this is a link to the stitch we are doing.

Tuesday, January 3, 2012

Knitting Pattern: Chunky Ribbed Hat


This yet again another present I had made for somebody for Christmas (see, I told you I was busy!). This was a really easy knit and also really fast. And again, I'm including videos for the different stitches you need to know (I might as well make this as easy for you as I can). I originally found the pattern on Ravelry by Groovy Mom. If you click on the link it will take you to the original pattern. I pretty much followed the pattern exactly, except instead of knit I did a twisted knit. The reason I did this is because of the type of yarn I used. I use a brand called Homespun and it tends to be really fluffy. The twisted knit tends to give the hat more structure which was needed with this type of yarn. I also decreased differently so the decrease wasn't so extreme.

So to get started you are going to need:
16 inch circular needle size 10
Size 10 DPNS (for the end of the hat)
A Ball of Bulky/12ply yarn (I used Homespun)
A stitch marker

What you need to know: (click on the stich you need to know to be taken to the video)
Long tail cast on
Join in circle 
Twisted Knit Stitch
Purl (continental) Purl (throwing)
K2TOG (Knit 2 Together)
P2TOG (Purl 2 Together)
Bind off
How to weave in the ends

Wednesday, December 28, 2011

DIY: Fire Starters


This is a simple and cheap gift idea for anyone with a fire place or outdoor fire pit. I made a bunch of these for the people I know with fireplaces. I was nervous since I don't have a fireplace to test them out, I didn't know if they would work until Christmas Eve! And yes, they do work! They are very easy to make and also very quick to make a bunch of them.


All you need is:
News paper
Lint from your dryer
Hemp
Pine cones

Optional:
Dried herbs (I used dried orange peel & whole cloves)

Wednesday, December 14, 2011

DIY: Shimmering Paper Ball Ornaments


After all my ornament making, my tree was still a bit barren. So I had one more ornament to make to help make it complete! I used the same non breakable ornaments since I have cats who just can't resist a ball on a tree.


What you'll need:
Ornaments
Hemp
Glitter
Mod Podge
Book Paper

DIY: Glitter Ornaments


Since I'm going all Martha Stewart on my Christmas tree I decided that I needed some ornaments to help tie in my tree topper. Now, I have cats, so that means I have to have non breakable ornaments, because you just never know when the tree will be turned into a jungle gym. I don't know if you've ever seen a non breakable ornament, but they are pretty simple and cheap looking. Definitely not the look I'm going for. So needless to say my cheap ornaments needed a face lift.

Here's what you'll need to get started:


Ornaments
Hemp
Glitter
Mod Podge

Tuesday, December 13, 2011

DIY: Shimmering Paper Star Tree Topper

Since I made everything for my tree, I decided that I needed to make the tree topper as well. This was fairly simple to make once I got the technique down and learned how to hold my hot glue gun without gluing me.


This is a very time consuming project so patience is mandatory! Find your zen! Also, you will have glitter EVERYWHERE. There is just no getting around that. 


What you'll need:
Mod Podge
Glitter
Hot Glue Gun
3D Cardboard/Paper Star
A Knife
Book Pages


Tuesday, November 29, 2011

DIY: Wood Beaded Ornaments

Ok, so here is a super simple and easy way to make some natural and rustic looking ornaments. If you made my wine cork garland, this is meant to match that as well. Are you ready for this? If you blink you might miss this tutorial because it's just that simple!

What you'll need:
Wooden beads
Twine
Scissors

Friday, November 25, 2011

DIY: Wine Cork Christmas Tree Garland

I don't know how many of you are wine drinkers, but in this house we drink plenty of it. I always save the corks so I can do something nifty with them. Well, today I filled up my jar of corks and decided it was time to empty it to make room for more. I just couldn't figure out what to do with them until I looked at my naked Christmas tree. So here is my simple tutorial on how to make my wine cork garland.

Here's what you'll need:
Hemp or twine (and a kitty to chew on it while you try to take a picture of your supplies, thanks Luna)
Some beads, or trinkets, or charms
Eye screws (enough to screw one on each end of the cork)
Scissors
Hot glue gun or the ability to tie knots
Wine corks (as many as you want. I used 16 wine corks, but if I had more I would of strung them closer together)

Monday, November 14, 2011

DIY: Recycled T-Shirt Scarf

This is a super simple way to use up some old t-shirts that you have lying around. It really only takes about 10 minutes to turn an old t-shirt into a super cute scarf! So here is the step by step!
What you need is an old t-shirt (with no seams down the side), a good pair of scissors, and a big tapestry needle.

Friday, November 4, 2011

DIY: Book Page Candle Holder


This is a simple way to out your own unique touch to candle holders or jars. They make great decorations and gifts! You can use any image that you can print on regular printer paper.

Saturday, October 22, 2011

DIY: Bohemian Chic Hair Pin


I found this super cute hair pin online at McLaughlin Designs the other day, and lucky me... there was a tutorial attached to it! It's really simple to do. 

You'll need:
a button (or a few)
a piece of felt in the same shape & size of the button
a bobby pin
some feathers
and a hot glue gun

Monday, October 17, 2011

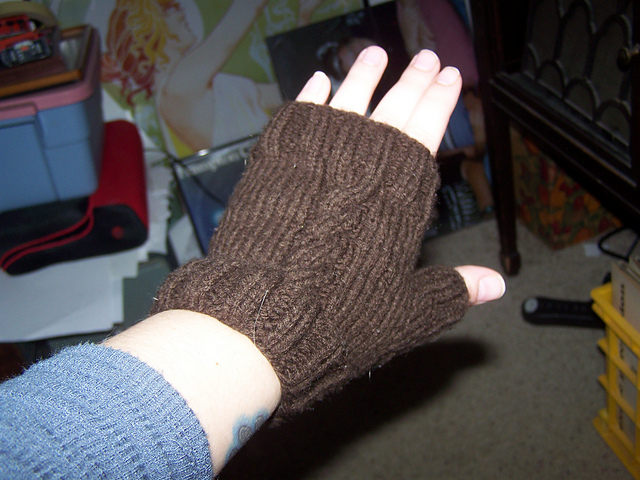
Knitting Pattern: Cabled Fingerless Mitts

I made these a while ago. I love them! I do wish I would of done the wrist cuff a tad longer, but they suit their purpose. I knitted them with a rather cheap wool, so i would recommend using a higher quality yarn so they don't pill as bad as mine do. Now, I don't make my own patterns. I'm not that skilled yet. So I bring you this pattern from Carissa Knits!

Sunday, October 2, 2011

DIY: Wine Cork & Bottle Projects


I don't know how many of you are wine drinkers, but I am. In fact, let's be honest, I love wine! Since I drink so much of it, I'm trying to find ways to reuse the bottles and the corks. Let's start with the cork!

Did you know there is something out there called a cork tree? I had no idea! It's actually called the Cork Oak Tree. And people strip the bark off the trees to make corks. I know what you're thinking (OMG! The poor tree! I'm never drinking wine again!) but let me tell you this interesting fact: When the bark is harvested from the Cork Oak properly, the bark grows back with no harm done to the tree. Thus making it a renewable sustainable resource. In fact it's all harvested by hand!
Time for some projects with c
orks don't you think?

Friday, September 30, 2011

Finally the Weekend!!!

I know we all love the weekends, but for me... OMG I freaking LOVE the weekend. It means I can spend endless hours gaming or crafting or cooking or whatever! No time limits, no stopping to talk to a client or boss, just what I want to do when I want to do it and for however long I feel like doing it.

On the agenda for this weekend is some hard core knitting, some movie watching, and some Halloween decorating (hopefully pictures will come of that)! I totally scored at the craft store and got really pretty yarn that I plan on making some shawls out of.
Related Posts Plugin for WordPress, Blogger...